Spatial Datasets (Origins and Destination Opportunities)
To measure access to destination opportunities (e.g. jobs, people, schools), you will need to ensure at least one spatial dataset has been added to your project. To add or manage spatial datasets, click the grid icon on the sidebar for Spatial Datasets.
Spatial datasets can be added either by uploading a CSV or shapefile representing the geographic distribution of opportunities, or by using the LODES data import tool (US only).
Uploading a spatial dataset
A spatial dataset representing origins or destinations of interest can be uploaded in one of three formats:
- CSV
- shapefile
- the custom Conveyal .grid format
To start an upload, click: Upload a new spatial dataset
Enter a name for the spatial dataset source, then select the appropriate file(s) and desired zoom level.
The zoom level specifies the spatial resolution used when converting a dataset source to Conveyal's custom grid format. The default is zoom level z9. Higher resolutions are available, but they should be used with caution, especially for large or low density data sources. Selecting high zoom levels may lead to unexpected results (if grids average fewer than one opportunity per grid cell) or excessive computation.
Click the upload button to start the upload. Datasets will be saved with the source name you entered and the attribute/column names of the uploaded files.
Saved datasets can be displayed as a dot-density map. These maps represent relative density, so the dots are not fixed quantities of opportunities in exact locations.
Troubleshooting
Certain limits on spatial uploads help ensure reasonable computation:
- The maximum number of grid cells is 5 million. If you encounter this limit, consider cropping the dataset to the region of interest or using a lower zoom level (see the table of approximate geodetic distances and size limits for different zoom levels here).
- The maximum number of opportunities in a layer is 2 billion.
- The maximum size of any single feature in the dataset source is 2 square degrees (roughly 20k sq. km. at the latitude of Melbourne or 25k sq. km. at the equator).
If you encounter other errors, additional troubleshooting suggestions are here.
CSV
A Comma Separated Value (CSV) file can be used to represent point features. The CSV should have columns for latitude, longitude, and associated opportunity counts.
In the following example, a CSV file represents the location of restaurants, along with the number of restaurants (1 per point) and the estimated number of employees at each. Such a dataset could be used to represent either opportunities for entertainment or for work.
lat,lon,restaurant_count,est_employees,name
39.111475,-84.633360,1,5,"La Rosa's Pizza"
39.105990,-84.556554,1,12,"Primavista"
39.103175,-84.509386,1,8,"Shanghai Mama’s"
39.160658,-84.543407,1,11,"Boswell Alley"
39.100883,-84.512742,1,25,"McCormick & Schmick's"
Note that only numeric fields will be accepted. The name field in this example would be dropped. Be careful to give each column a meaningful name in the header row and remove any numeric columns (such as ID fields) that do not represent meaningful counts. Be sure to name the file with a .csv extension and use only commas as separators, i.e. no tab-separated or fixed-width text files.
You will be prompted for the names of the fields containing latitude and longitude values. In the example above you would enter lat and lon respectively. We currently only support CSV files which specify points in WGS 84 latitude/longitude coordinates. Note also that these fields are case sensitive.
Freeform (Non-Grid) Points
When a spatial dataset is uploaded, Conveyal distributes its numeric attributes to a shared raster grid by default. With a CSV file specified, you will also have the option to save points and associated attributes at their exact coordinates. You can then use these freeform (non-grid) spatial datasets for origin-destination travel time matrices and other analyses.
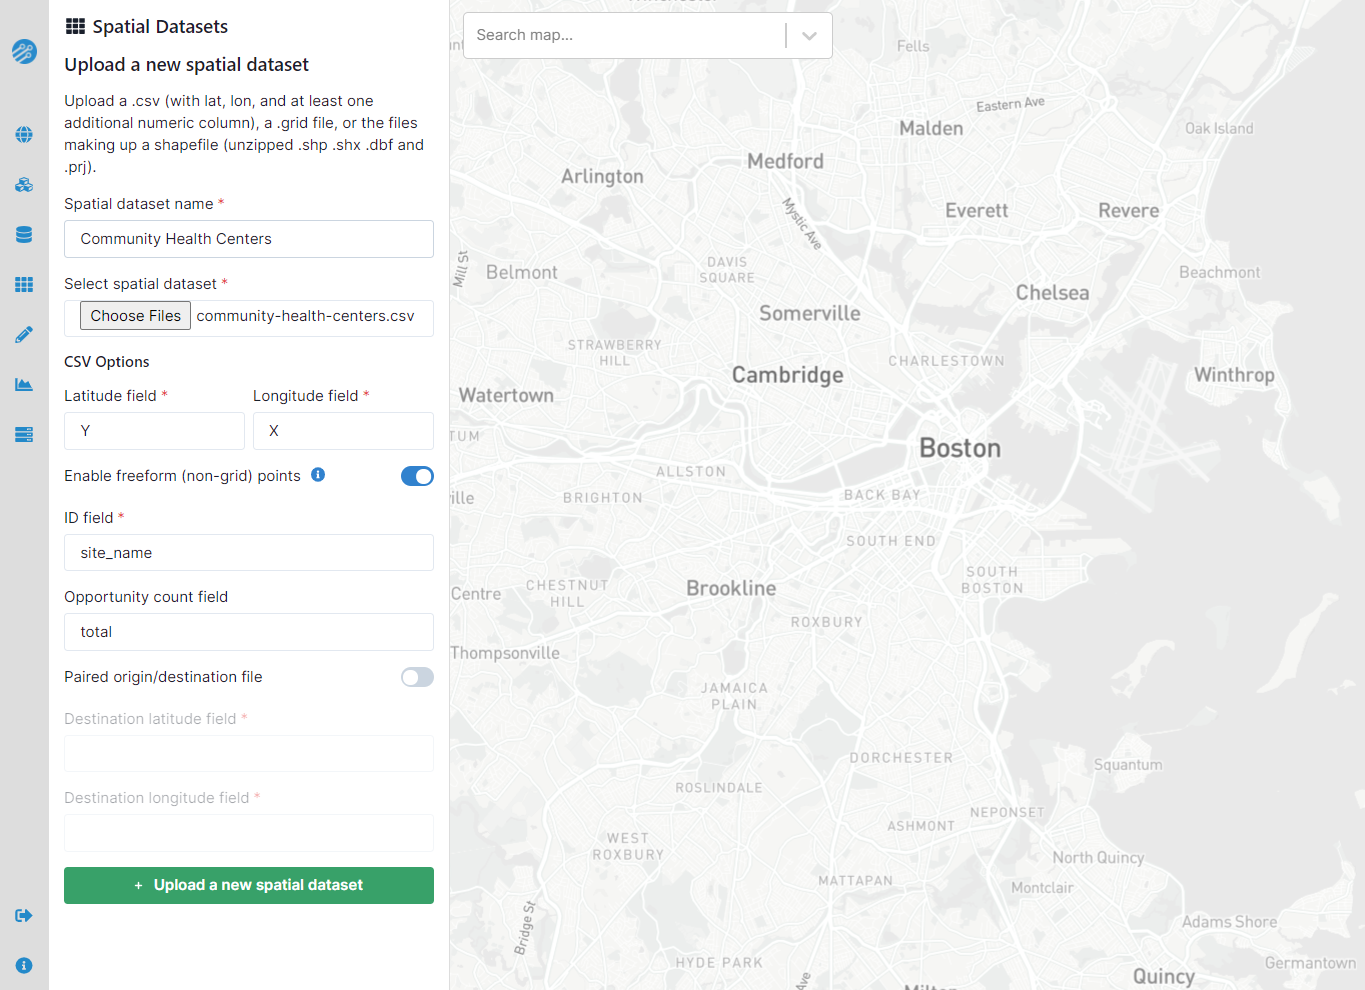
In addition to the standard latitude and longitude columns, CSV files to be processed as freeform spatial dataset require a column of unique identifiers as the "ID field." This field, along with optional count and destination latitude/longitude columns (again, case sensitive), can be specified when the "Enable freeform (non-grid points)" switch is toggled on, as shown above. If you do not specify a count column, a layer of count = 1 for each row will be added. Once a freeform dataset has been processed, you can inspect it on the map and use it in certain regional and custom analyses.

Shapefiles
A shapefile may represent origin populations or destination opportunities as either points or polygons. Opportunity counts associated with polygons will be treated as though they are uniformly distributed within the given area. Using polygons with very low densities (below approximately 16 opportunities per square kilometer) may introduce noise. To mitigate this noise, consider multiplying by a scaling factor (e.g. 10) before upload, then dividing analysis results by that factor.
For the easiest experience, any numeric fields not representing opportunities (ID fields, etc) should be removed before uploading. As with CSV, text fields will be dropped - this includes fields which may look like numbers (e.g. "1", "NA") but are actually stored as text. If a field is not showing up after upload, ensure that it was actually stored as a numeric value rather than text.
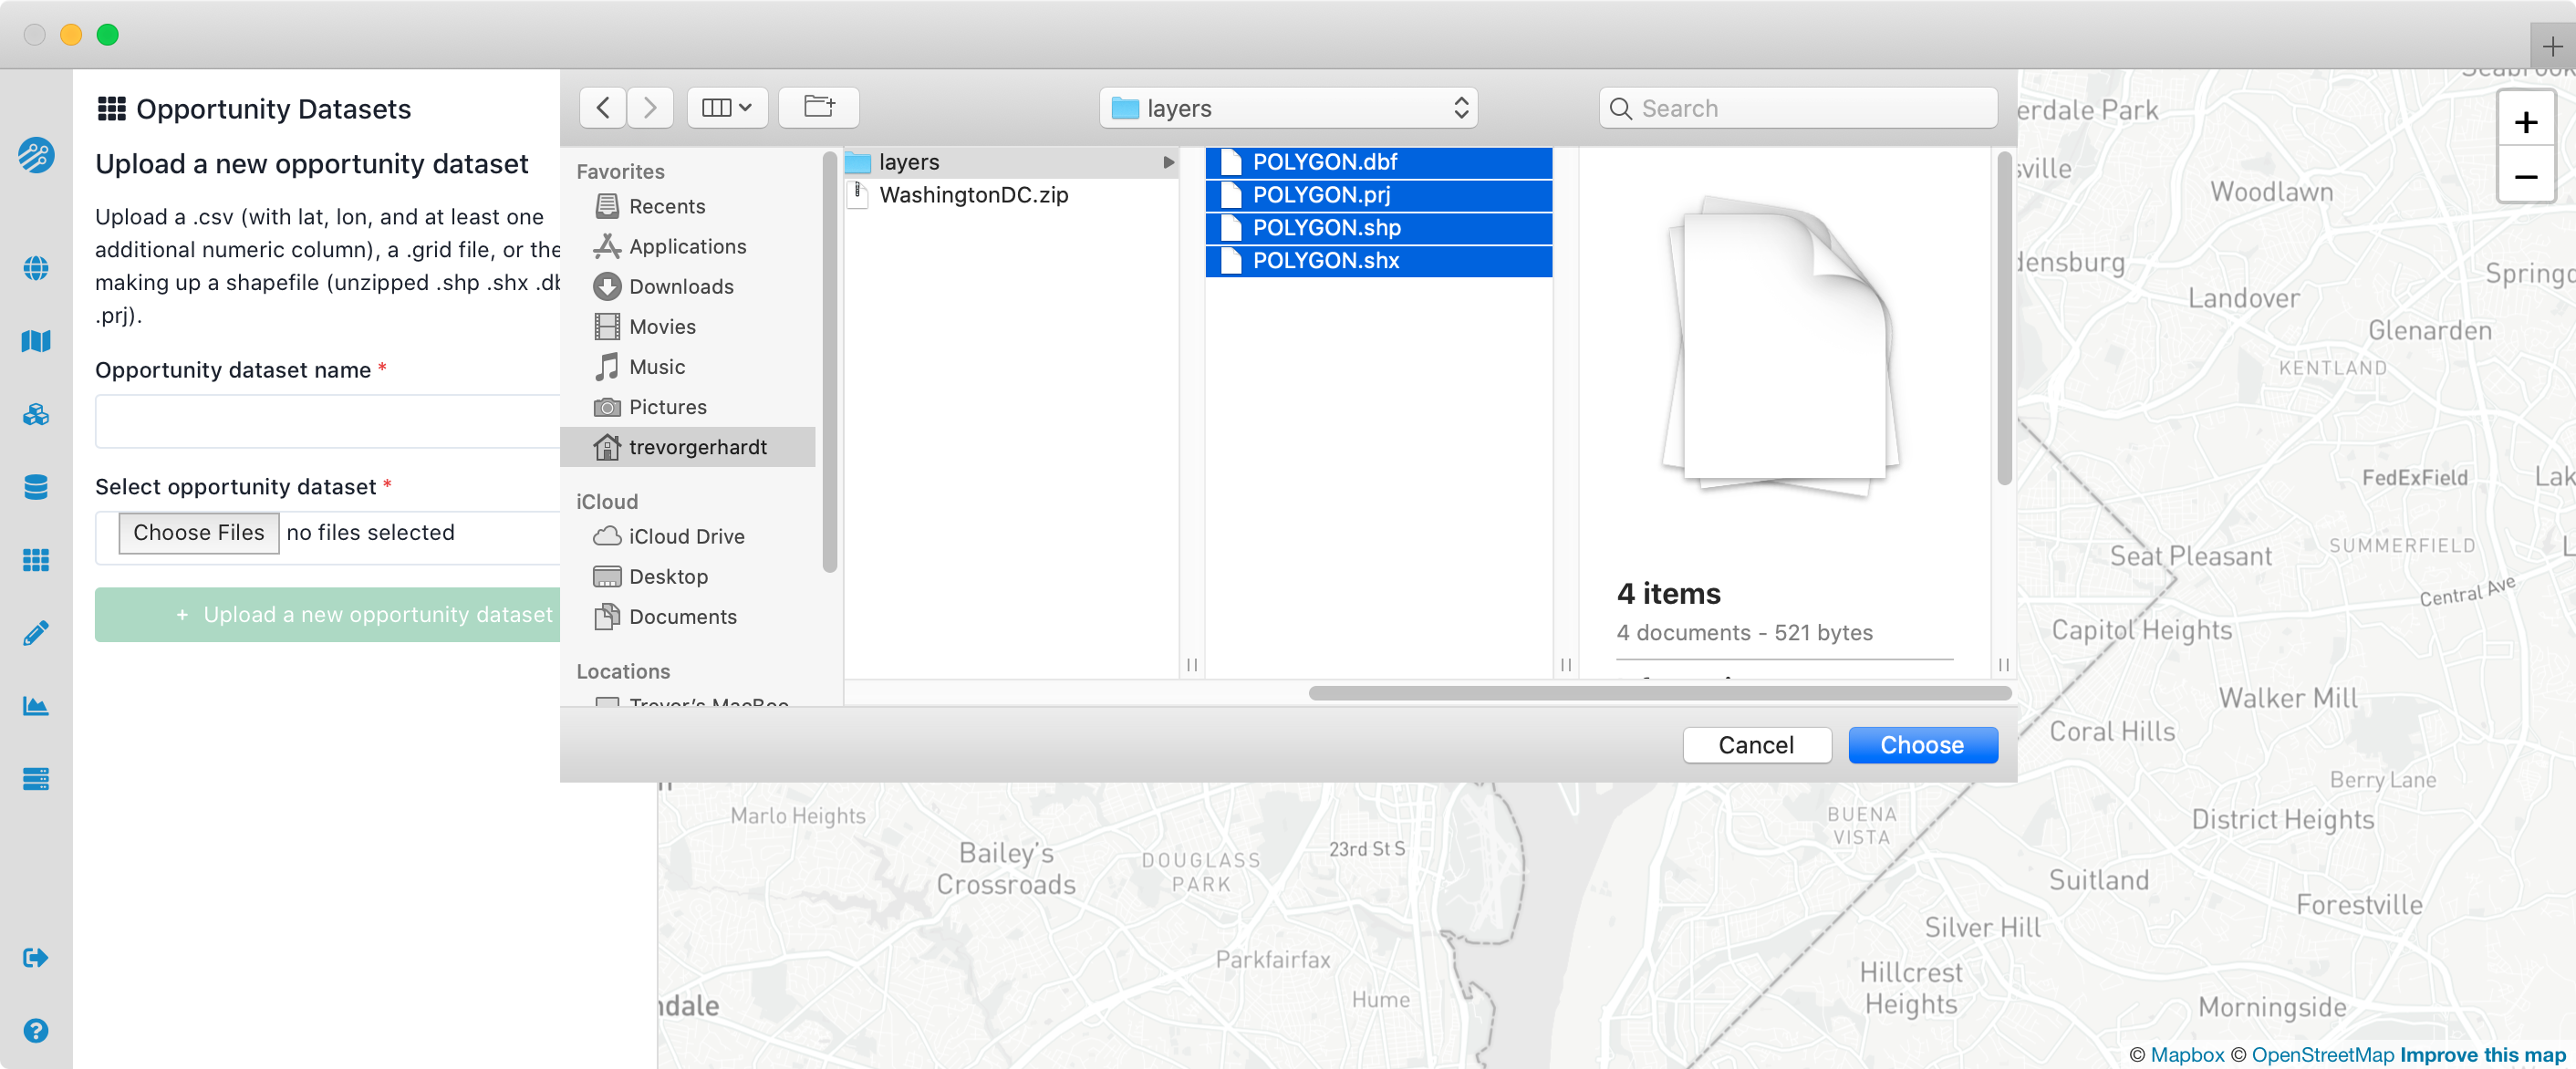
Shapefiles should not be zipped; select all of the files in the Shapefile when uploading (at the very least, .shp, .shx, .dbf and .prj). How you select multiple files depends on your browser and operating system, but generally will involve shift-clicking, control-clicking or command-clicking.
Managing spatial datasets
Selecting an existing spatial dataset layer from the dropdown menu will give you options to:
- Delete this layer
- Delete all layers from the same dataset source (e.g. all attributes from a shapefile)
To rename a layer, click on its name.
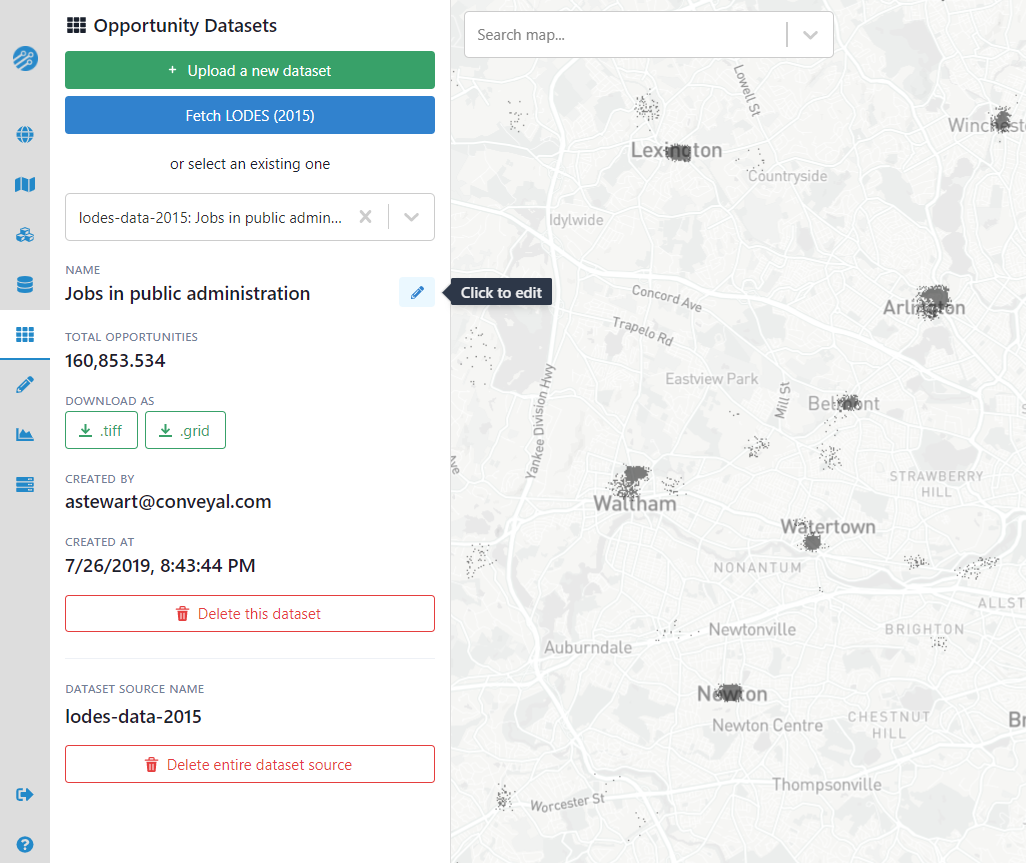
Details of the layer, such as the total number of opportunities and upload date are also shown. You can download a dataset layer as a geoTiff raster file for use in an external GIS application, or you can download it in the Conveyal custom .grid format, which may be useful for preserving the exact data used in an analysis or transferring it between regions.
LODES dataset import
For projects in the United States, employment data from from the Longitudinal Employer-Household Dynamics (LEHD) Program can be imported with a one-click import function: Fetch LODES (2022)
The default spatial resolution for LODES imports is set to grid cell zoom level z9. Higher zoom levels are available, but they should be used with caution.
The LODES (LEHD Origin-Destination Employment Statistics) dataset provides block-level data on the home and work locations of employed people living in the US. These job and worker counts are made available both as totals and as counts disaggregated by industry, earnings, education level, etc. The LEHD program generally releases data with a 2-3 year lag.