Managing modifications
Managing modifications
Modifications can be grouped by project and scenario, and different projects and scenarios can be compared against each other in analysis mode, giving you flexibility on how to use them. Depending on your use cases, different approaches may make sense.
If one user will be responsible for analyses in your region, involving a relatively small number of modifications, we recommend doing your work in one project and assessing the impact of different combinations of modifications by creating and using scenarios within that project.
If multiple users will be involved in editing scenarios, or if you want to assess more than 10 different combinations of modifications, which would make the list of scenarios annoyingly long, we recommend dividing the modifications among different projects. For example, one team member could code rail scenarios in Project A, another team member could code bus scenarios in Project B. Modifications can be imported between projects that use the same network bundle; in this example, modifications from the two projects could combined in a third Project C.
Toggling display of modifications
In the list of modifications on the initial view in editing mode, clicking the title of a modification will open it and allow you to edit it. To control whether each modification is displayed on the map, click the eye icon () next to each modification.
Stops and segments representing modifications are displayed on the map using different colors to indicate their state relative to the baseline network:
- Blue: Added trip pattern or streets
- Red: Removed trip pattern
- Purple: Changed timetable (e.g. modified frequency, speed, or dwell time) or street network
- Gray: Unchanged (alignment is unchanged but the trip pattern is effected somehow, e.g. reroute)
Projects start with only a Default scenario, plus a locked Baseline scenario which does not accept modifications. You can create additional scenarios by clicking the create button, and entering a name.
When the Scenario list is expanded, options next to each scenario, excluding the baseline, allow you to:
- Show on the map all (and only) the modifications active in the scenario
- Rename the scenario
- Delete the scenario (excluding the default)
Exporting modifications
To see options for exporting scenarios from the top of the editing panel, click Download or share this project.
A panel will then be shown with multiple options to download or share the scenarios in your project:
- Raw scenario (.json) all scenario details
- New alignments (.geojson) alignments of add-trip modifications
- New stops (.geojson) new stop locations created in the scenario
- Summary Report a summary of all modifications in a scenario, for printing or reference. Keep in mind that some browsers may not print more than 30 pages or so of a long report.

Importing modifications
To import modifications from another project or a shapefile, click Upload/import modifications.
From another project
Occasionally, you may want to copy all of the modifications from one project into another. This may be useful to make a copy of a project, or to combine modifications developed by different team members into a single project (for instance, one team member working on rail changes and another on bus changes).
To do so, select a project in the upload/import panel and click Import
If you choose a project associated with the same GTFS bundle, all modifications will be imported; when there are multiple scenarios, the scenarios in the project being imported will be mapped directly to the scenarios in the receiving project (i.e. modifications in the first scenario will remain in the first scenario in the new project).
If you choose a project associated with a different GTFS, bundle, only add-trip modifications will be imported.
From shapefiles
In general, it is best to create all modifications directly in Conveyal Analysis as it allows full control over all aspects of transit network design. However on occasion it may be desirable to import modifications from a shapefile. If you have a shapefile containing route geometries, you can upload it to Conveyal Analysis and have it turned into a set of add trip pattern modifications. Your shapefile will need attributes (columns) for each line's:
- name (e.g. route id)
- approximate headway in minutes
- approximate speed in kmph
The shapefile should contain only linear features. Points on the lines will be converted into control points in the modification and by default stops will be spaced uniformly along the line. If you think you may want to edit the alignment later in Conveyal Analysis, it might be helpful to simplify complex geometries before uploading them.
To upload a shapefile from the upload/import panel (), click
ImportAfter selecting and uploading a zipped shapefile, you should see the following options. You'll need to use the dropdown menus to identify the attributes from your uploaded shapefile that will be used to generate the modifications.
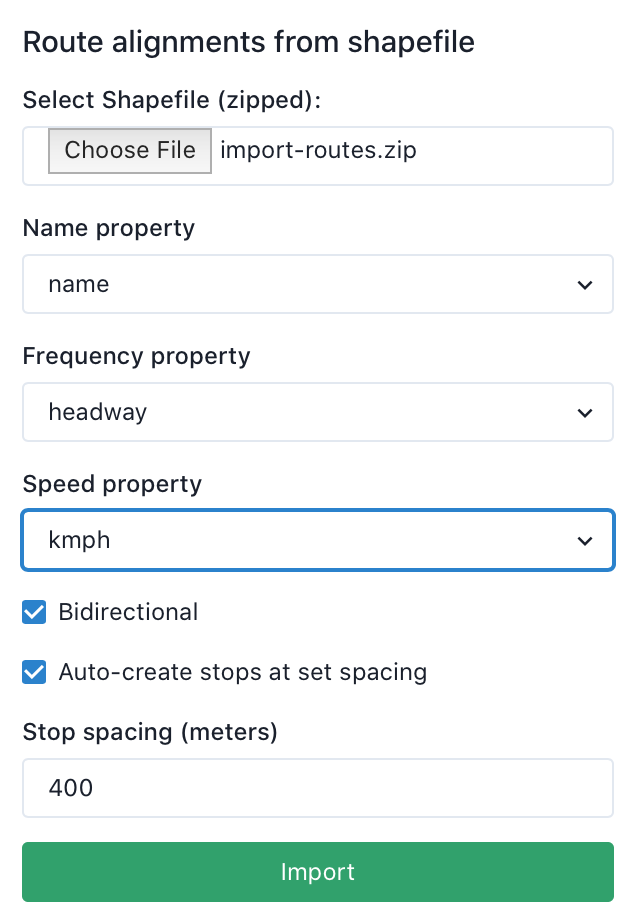
Finally, as shapefiles only contain the route geometry and not the stop locations, stops can be created automatically at a specified spacing. Stops may be explicitly added or moved after import.
Manually edit raw modifications (beta)
By clicking on "Customize modification" in the details pane for any modification, advanced users can copy, paste, and edit its raw JSON data.